
In this section, we’ll orchestrate the provisioning of multiple virtual machines using Terraform. Additionally, we’ll leverage ansible ad-hoc commands and Terraform local-exec to facilitate the installation and configuration of software on these newly provisioned virtual machines.
Use the below code to install the python on the controller node
#!/bin/bash

#ansible
sudo apt update
sudo apt install software-properties-common
sudo add-apt-repository --yes --update ppa:ansible/ansible
sudo apt install ansible
Here is the complete Terraform code designed to establish a user with the specified configuration. It includes the steps to copy the public key to the newly provisioned VMs. This setup facilitates subsequent Ansible executions by allowing the use of the private key for login.
admin_ssh_key {
    username   = "adminuser"
    public_key = file("~/.ssh/id_rsa.pub")
  }
terraform {
  required_version = ">= 1.2.2"
  required_providers {
    azurerm = {
      source  = "hashicorp/azurerm"
      version = ">= 3.10.0"
    }
  }
}

provider "azurerm" {
  features {}
}


data "azurerm_resource_group" "example" {
  name     = "Multitenant"

}


resource "azurerm_virtual_network" "example" {
  name                = "myVnet"
  address_space       = ["10.0.0.0/16"]
  location            = "Southeast Asia"
  resource_group_name = data.azurerm_resource_group.example.name
}

resource "azurerm_subnet" "example" {
  name                 = "mySubnet"
  resource_group_name  = data.azurerm_resource_group.example.name
  virtual_network_name = azurerm_virtual_network.example.name
  address_prefixes     = ["10.0.1.0/24"]
}

resource "azurerm_network_security_group" "example" {
  name                = "myNSG"
  location            = "Southeast Asia"
  resource_group_name = data.azurerm_resource_group.example.name
}

resource "azurerm_network_security_rule" "allow_ssh" {
  count = length(var.security_group_rule)
  name                        = var.security_group_rule[count.index].name
  direction                   = "Inbound"
  access                      = "Allow"
  protocol                    = "Tcp"
  source_port_range           = "*"
  source_address_prefix       = "*"
  destination_address_prefix  = "*"
  resource_group_name         = data.azurerm_resource_group.example.name
  network_security_group_name = azurerm_network_security_group.example.name
  priority                    = var.security_group_rule[count.index].priority
  destination_port_range      = var.security_group_rule[count.index].destination_port_range

}

resource "azurerm_public_ip" "pip" {
  count               = 2
  name                = "${count.index}-pip"
  resource_group_name = data.azurerm_resource_group.example.name
  location            = "Southeast Asia"
  allocation_method   = "Dynamic"
}

resource "azurerm_network_interface" "example" {
  count               = 2
  name                = "myNIC1-${count.index}"
  location            = "Southeast Asia"
  resource_group_name = data.azurerm_resource_group.example.name

  ip_configuration {
    name                          = "myNIC-${count.index}-config"
    subnet_id                     = azurerm_subnet.example.id
    private_ip_address_allocation = "Dynamic"
    public_ip_address_id          = azurerm_public_ip.pip[count.index].id
  }
}

resource "azurerm_network_interface_security_group_association" "example" {
  count               = 2
  network_interface_id      = azurerm_network_interface.example[count.index].id
  network_security_group_id = azurerm_network_security_group.example.id
}

resource "azurerm_linux_virtual_machine" "example" {
  count                = 2
  name                 = "myVM-${count.index}"
  resource_group_name  = data.azurerm_resource_group.example.name
  location             = "Southeast Asia"
  size                 = "Standard_DS1_v2"
  admin_username       = "adminuser"
  # admin_password       = "Password1234!"
  # disable_password_authentication = false
  admin_ssh_key {
    username   = "adminuser"
    public_key = file("~/.ssh/id_rsa.pub")
  }

  network_interface_ids = [
    azurerm_network_interface.example[count.index].id,
  ]

  os_disk {
    caching              = "ReadWrite"
    storage_account_type = "Standard_LRS"
  }

  source_image_reference {
    publisher = "Canonical"
    offer     = "UbuntuServer"
    sku       = "18.04-LTS"
    version   = "latest"
  }

  computer_name = "myVM-${count.index}"
  custom_data    = base64encode(data.template_file.linux-vm-cloud-init.rendered)


  provisioner "local-exec" {
    command = "echo ${azurerm_public_ip.pip[count.index].ip_address} >> inventory"
  }

}


data "template_file" "linux-vm-cloud-init" {
  template = file("install.sh")
}
Write the public Ips of the vms to a inventory file with below command using local-exec provisioners
provisioner "local-exec" {
    command = "echo ${azurerm_public_ip.pip[count.index].ip_address} >> inventory"
  }
ansible.cfg is the main configuration file for Ansible, a powerful open-source automation tool. It allows you to configure various settings for Ansible, tailoring its behavior to suit your specific needs. Here’s a use case to illustrate how ansible.cfg can be employed:
ansible.cfg content
[defaults]
inventory = ./inventory
deprecation_warnings = False
remote_user = ansibletest
host_key_checking = False
gather_facts = False   # Disable automatic fact gathering
fact_caching = jsonfile

[privilege_escalation]
become = true
become_method = sudo
become_user = root
become_ask_pass = False
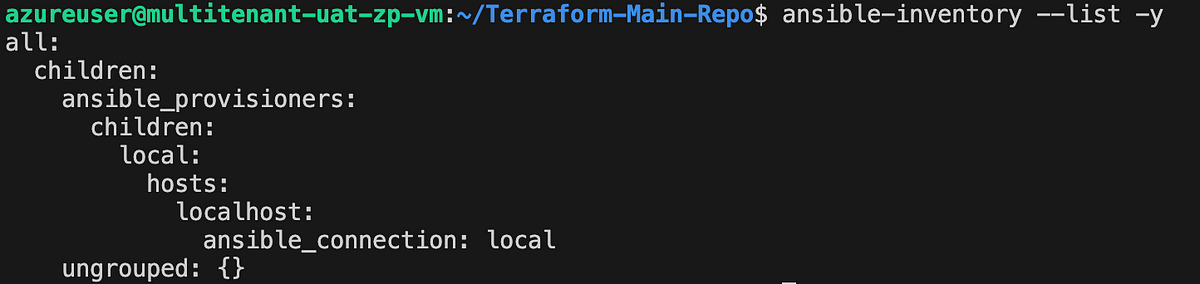
To edit the contents of your default Ansible inventory, open the /etc/ansible/hosts file using your text editor of choice, on your Ansible control node:
ansible-inventory --list -y
You’ll see output similar to this, but containing below server infrastructure as defined in your current directory

Kindly exit the current folder using the provided instructions and reissue the command. This time, the command should reference the default path, specifically /etc/ansible/hosts, as there is currently no inventory file in the present directory. To customize the inventory path, you have the option to override the default by creating a new inventory file in the current directory.
The provided command utilizes Ansible’s integrated ping module to conduct a connectivity assessment across all nodes listed in your default inventory. The connection will be established as the root user. The ping module assesses the following:
- Accessibility of hosts.
- Validity of SSH credentials.
- Capability of hosts to execute Ansible modules using Python.
The expected output should resemble the following:
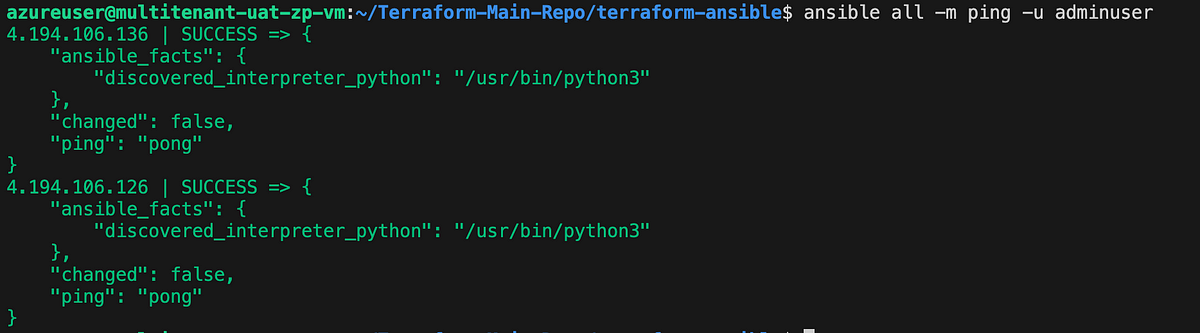
Once you’ve verified the successful communication between your Ansible control node and the designated hosts, you can commence the execution of ad-hoc commands and playbooks on your servers.
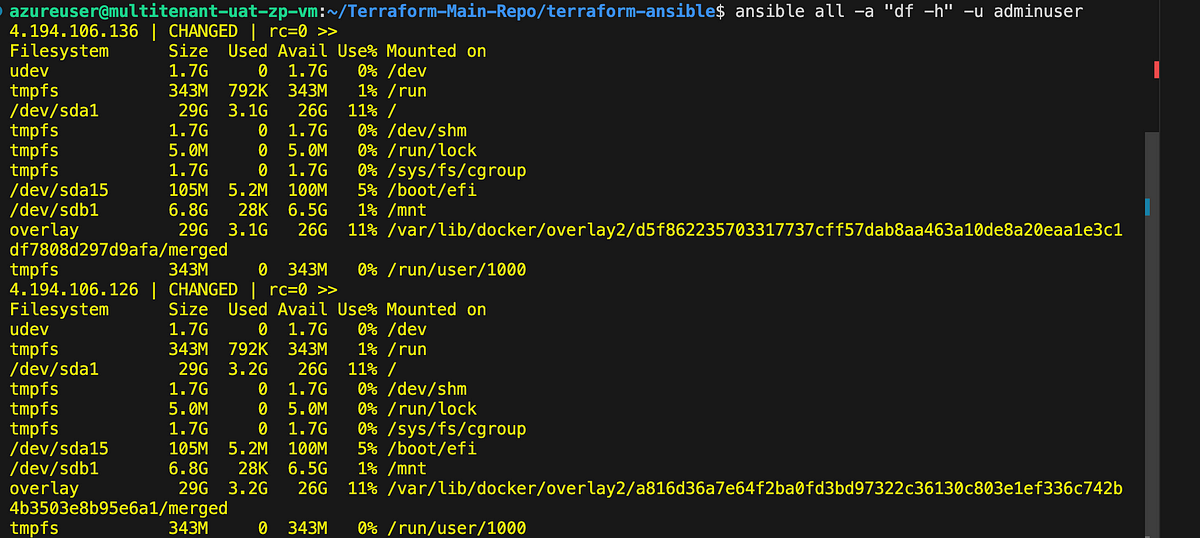
Any command typically run on a remote server via SSH can be executed using Ansible on the servers listed in your inventory file. For instance, you can examine disk usage on all servers by employing the following command
ansible all -a "df -h" -u admintest
Result
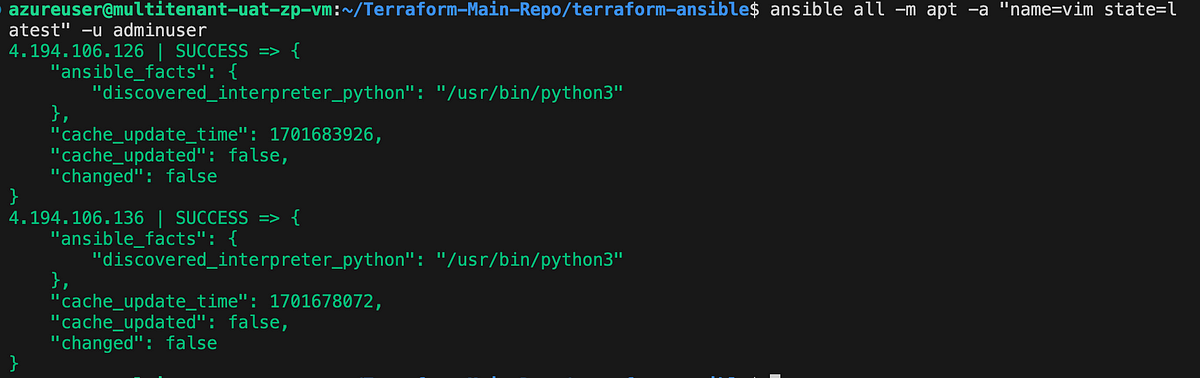
You have the capability to run Ansible modules through ad-hoc commands, mirroring the approach taken earlier with the ping module for connection testing. As an illustration, here’s a demonstration of utilizing the apt module to install the latest version of vim across all servers specified in your inventory:
ansible all -m apt -a "name=vim state=latest" -u adminuser
Result
we can do nginx installation usign adhoc commands , no need to follow the below structure everytime
Ref link https://docs.ansible.com/ansible/latest/collections/ansible/builtin/apt_module.html
This command instructs Ansible to utilize the apt module, specifying the nginx package to be installed (state=present). Make sure to adapt the syntax based on your specific requirements.
- name: Install apache httpd  (state=present is optional)
  ansible.builtin.apt:
    name: apache2
    state: present
ansible all -m apt -a "name=nginx state=present" -u adminuser
Invoke the adhoc command using the terraform local-exec as below
provisioner "local-exec" {
    command = "ansible all -m shell -a 'apt -y install apache2; systemctl restart httpd'"
  }
In the upcoming article, we will delve deeper into ansible-playbook, providing comprehensive examples for a more thorough understanding.